
Developer App (Tool)
Tool ·
Every customer that uses our Bloomreach Content SaaS product has two CMS instances provisioned.
- A Sandbox CMS instance, which is typically used for Development and QA environments
- A Production CMS instance, which is typically use for Acceptance/Staging and Production environments
In order to facilitate the transfer of content and/or configuration from one CMS instance to another, we've created a standalone application that utilizes the Content SaaS Management APIs.
The application can be accessed at https://content-tools-devapp.bloomreach.works/ or it can be cloned/forked from the public GitHub repository: https://github.com/adampengh/bloomreach-content-saas-ui-extensions
Featured Functionality
- Copy Content Types between instances
- Copy Pages between channels in a single instance
- Edit Channel configuration/properties
- Copy Channel configuration between instances or between channels in a single instance
- Copy/Delete Components
- Copy/Delete Layouts
- Copy/Delete Routes
- Copy/Delete Menus
- Batch Export Content
- Batch Import Content
Getting Started
Create an API Token for Each CMS Instance
- Log in to Bloomreach Content using an account with Site Developer privileges.
- Navigate to Setup > brXM API token management
- Click on the + API token button in the top right
- Fill in a Token name, choose an Expiration date, check the Read and/or Write checkboxes for the APIs you want to use the token with, and click on Create. We recommend setting the expiration date as soon as possible, to automatically limit the risk of accidental credential exposure.
- Copy the token to the clipboard or write it down. This is the only time it will be displayed. We recommend simply creating new tokens at need, rather than attempting to store the token value in a password manager or other long-term storage.
Configure the Developer Extension Application
When first accessing the application, you will be redirected to the Configuration page. Here you will see configuration settings for a Source Environment and Target Environment.
- The Source Environment is the CMS instance you want to copy content/configuration from or make configuration changes in.
- The Target Environment is the CMS instance where the content/configuration will be copied to.
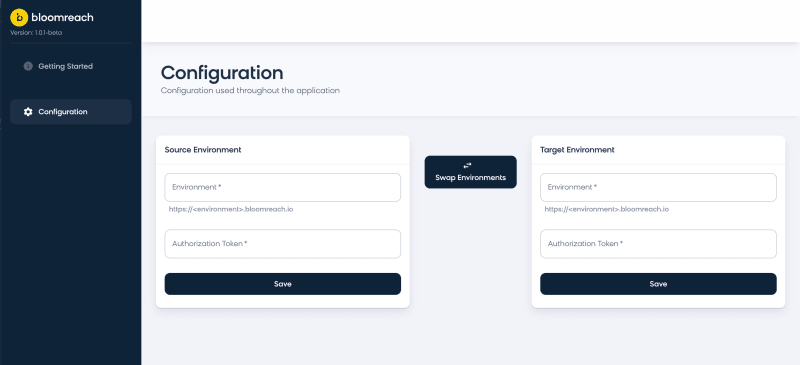
In the Source Environment:
- Enter the namespace of the environment. This is the subdomain portion of the URL immediately before bloomreach.io.
- Enter the API Token generated earlier.
- Click Save.
- From the Projects dropdown, either select an existing Developer Project or click the "+" button to create a new Developer Project.
- To copy Content Types between instances, there needs to be an active Developer Project that includes Content Type Changes in the Target Environment.
In order to copy content/configuration to the Target Environment, follow the above steps for the Target Environment configuration section.
After the configuration has been set, the configuration is saved in the browser's localStorage.
Sample Actions
Copying Content Types
- Click on Content Types from the sidebar navigation
- Select the Content Types to copy in one of two ways:
- Click on the copy button next to a single Content Type or
- Select the checkbox of multiple Content Types, then click the Copy button on the top right of the page
- In the confirmation modal, review the changes, then click the Copy button
Copying Components
- Add the channel to the currently selected Source Environment project. If the channel has already been added, skip to Step 6
- Click on Projects from the sidebar navigation
- Click on the Project from the list of Source Projects
- Click the "Add Channels" button
- In the modal, select the channels to add and click "Add Channels"
- Click on Channels from the sidebar navigation
- Click on the channel from the list of channels in the currently selected Source Environment project
- Click on the Components tab
- Select the Components to copy in one of two ways:
- Click on the copy button next to a single Component or
- Select the checkbox of multiple Components, then click the Copy button on the top right of the page